When it comes to effectively protecting construction sites from erosion with rolled erosion control products (RECPs), proper product selection is only half the battle. The next hurdle is proper installation. While many people consider this to be an easy part of the process, the fact is it cannot be taken lightly. The majority of unsuccessful erosion control product applications fail due to improper installation of the materials. It takes more than rolling products into place to realize the maximum benefits they can provide. Here are some tips on how to properly install turf reinforcement mats (TRMs) to ensure the best possible immediate protection and long term performance.
Why Do Some Rolled Erosion Control (RECP) Installations Fail?
Those who are inexperienced in installing RECPs often don’t understand what goes into the proper placement of RECPs. They go into it thinking they can quickly install the mat without attention to detail and move on to the next task. However, simply rolling out the product and anchoring it with a few staples here and there is not enough to ensure effective product performance. That said, proper installation is quite simple for those willing to take the time to do it correctly. Whether you are installing erosion control blankets (ECBs) or TRMs, it is important to follow the product manufacturer’s instructions. Erosion control products differ from manufacturer to manufacturer, and while knowing the basic steps of the procedure is useful, you still need to adhere to the manufacturer’s specific guidelines. They specify exactly how their products should be installed for best results.
Adjust Installation to Location
One of the first steps in proper installation is knowing what type of application the product will be used in, as installation details often vary with application. The following are three common types of applications that TRMs are often used in, along with some general guidelines for effective installations. Once again, for best results, always consult the individual product manufacturer’s installation guidelines.
Overview of the Installation Process
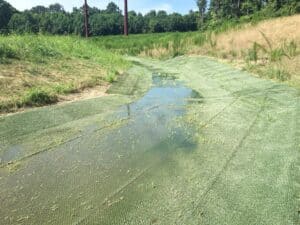
If a contractor understands the reasons for the various installation procedures, they are more likely to pay attention to detail and do it right the first time. The basic objectives of proper TRM installations are to 1) Securely hold the TRM in place to maintain continuous contact with the soil surface. This is crucial to the product’s ability to protect the soil and allow for uninhibited vegetation growth through its structure. If the bottom of the TRM is not in direct contact and interacting with the underlying soil surface, the TRM is providing very little erosion protection in that area, and may keep elongated grass stems and leaves from emerging through its structure (which will likely eventually kill the vegetation).
2) Prevent water from flowing under the TRM and undercutting the mat at seams and terminal edges. If water flow finds its way under the TRM, especially if there are existing gaps between the TRM bottom and soil surface (see objective #1), then erosion will start to occur beneath the mat. Likewise, erosion of unprotected soils along terminal edges can undercut the mat and continue beneath. Once significant erosion starts beneath a TRM, it will likely progress until suitable repairs are made.
Note that some TRMs, such as the new InstaTurf ShearForce10 Erosion Control Turf Reinforcement Mat, have properties which enhance conformance and adherence with the underlying soil, which makes achieving the objectives above easier and more practical in the field.
The following steps are aimed at achieving these objectives.
- Select the Proper Anchors
Start by considering the severity of the application and the type/consistency of the soil the TRM will be anchored in. Some TRM manufacturers recommend higher anchor rates in applications where the flow conditions approach the product’s performance limits. Soil type and consistency will affect the holding power and pull-out resistance of individual anchors. In general, 8 inch sod staples, stakes or fabric pins are typically fine for compacted fill or undisturbed cohesive soils, with one caveat. In colder climates, freeze/thaw potential may necessitate longer staples/stakes, screw-type anchors or percussion-driven earth anchors (PDEAs) to prevent frost-heaving. On sandy, non-cohesive soils, 12 inch – 18 inch staples or fabric pins are typically required, with PDEAs necessary in some cases. For an example of anchor recommendations for the new InstaTurf ShearForce10 ECTRM, check out ShearForce10 Channel Install Guide.
- Prepare the Site
Once you know the type and size of the anchors needed, it’s time to prepare the site for the TRM installation. Start by clearing and grading the area to be protected. Make sure that the soil surface on which the TRM will be laid is smooth and free of anything that can cause significant voids between the bottom of the mat and the soil surface. This includes filling and compacting any voids, as well as removing any rocks, clods, sticks, roots, and other debris greater than 2 inches in diameter. Preferably the prepared soil surface will resemble that of a finely graded new lawn area that’s ready for seeding.
- Apply Seed and Soil Amendments
The next part of the process is applying the prescribed seed mix and any necessary soil amendments such as lime and fertilizer. Application of seed and soil amendments are typically accomplished by broadcasting, drilling or hydro-seeding. Note that some TRM manufacturers may recommend applying the seed on top of the TRM after it’s installed, or a combination of under and over seeding.
- Construct the Anchor Trench
Anchor trenches are commonly used to secure the terminal edges of TRMs, such as at the head of a drainage channel and top edges of its side slopes. . Anchor trenches are intended to keep incoming water flow on top of the mat and prevent any erosion from unprotected adjacent areas from undermining the TRM. Most manufacturer’s recommend a 6-inch to 12-inch deep by 6-inch to 12-inch wide anchor trench, depending on the location of the trench and amount of incoming water flow. The location of the anchor trench will depend on the type of application. On slopes, it’s typically placed at the very top or over any existing shoulder. For channels, anchor trenches are usually constructed at the beginning of the channel, terminal end of the channel, and sometimes at intermittent locations in between. For shorelines, it is placed at the top of the shoreline slope and terminal edge at or below the waterline. When constructing an anchor trench is not practical, some manufacturers alternatively recommend using a row or two of closely spaced anchors along the terminal edges instead. This practice works better with some TRMs than others. However, it has been found effective with the new InstaTurf ShearForce10 ECTRM in locations with limited incoming runoff (eg side slope edges). See Anchor Check details here.
- Secure TRM in Anchor Trench
Once the anchor trench is constructed, follow the manufacturer’s guidelines and properly position the TRM into the anchor trench, making sure the TRM roll or rolls are aligned properly to form any required overlaps and with the surface to be protected. Some manufacturers recommend a covered (no exposed fill soil) anchor trench while others suggest exposed surface trenches, often dependent upon location of the trench. For example, an anchor trench across the width of a drainage channel should be covered so that there’s no exposed fill soil that can easily erode in the channelized water flow and lead to undermining of the mat’s terminal end. However, anchor trenches at the top of the channel’s side slopes may be left uncovered, as minimal incoming sheet flow runoff usually won’t cause excess erosion of the fill soil in these areas. After the TRM is positioned as necessary in the trench, staple the mat into the bottom of the trench, backfill and compact the soil. For covered trenches, additional seed may be applied over the fill soil before covering with the terminal edge of the TRM. Install additional staples along the terminal edge as recommended.
- Unroll the TRM
After securing the TRM into the anchor trench, unroll the mat over the area to be protected. Make sure to guide the product over the soil surface carefully, aligning edges of adjacent mats to create any recommended overlap seams. For optimum erosion protection, it is vital to maximize soil contact. Slightly stretch and allow the TRM to relax on its own to smooth out any wrinkles in the mat and improve conformance to the soil surface. It’s often recommended to allow unrolled TRMs to rest for 15 minutes to normalize their surface temperature and allow for any thermal expansion/contraction before further anchoring takes place.
- Seam Adjacent Rolls
Depending on the type of TRM, adjacent rolls may be butted together at their edges or overlapped 2 inches – 6 inches. Some TRMs may also require additional anchors along seams. Follow the manufacturer’s guidelines closely to ensure that roll edges will stay together and water doesn’t encroach the seam area. Note that larger overlaps may seem beneficial, but a double layer of mat can impede vegetation growth along the seam, so keeping the overlap width to a minimum is usually desirable. Large overlaps also consume more product than necessary, increasing installation costs.
- Secure TRMs with Appropriate Anchors
The next step is to secure the mat/s using the specified anchors.and anchoring rate/placement pattern. Depending on the type of anchor used, this is usually done with a hammer, mallet or stapling device. Screw-type anchors may require hand-held drills while percussion-driven earth anchors will also require a drive rod and potentially a setting tool. No matter what method is used,make sure to, at a minimum, follow the manufacturers’ prescribed anchor rate and placement pattern. Additional anchors may be necessary to adequately conform the mat to rough soil surfaces that weren’t very well prepared. More anchors may also be needed at the vertices of channel side slopes and channel bottom. For TRMs that require placement of soil and seed on top of their structures, do so after all anchors are installed. Note – such soil-infilled TRMs will likely require an additional ECB installed on top of the infilled soil to control near-term erosion and promote vegetation establishment.
What to Remember When Installing a Turf Reinforcement Mat (TRM)
Proper installation is crucial when it comes to TRMs. They are meant for locations that are exposed to high flow runoff and significant shear stress. Any miscalculation or deviation from the manufacturer’s guidelines can lead to a failed project, which can prove to be costly for contractors. In order to remember the basic procedures for effective TRM installations, it is vital to keep erosion control principles in mind. These are principles that guide erosion management practices and product usage.
Limit Erosive Forces
The goal is to reduce erosive forces and increase resistance as much as possible. If the erosive forces impacting the soil are greater than the soil’s resistance, then erosion will take place. This is why proper placement and installation of the product is vital for erosion protection. The TRM must remain in constant contact with the soil surface in order to effectively protect it.
Grading and Soil Preparation
Regardless of where you are installing a turf reinforcement mat, the process will begin with preparing the terrain. Grading soil and removing items that can prevent the TRM from conforming to the soil surface is essential. Remember, fine grading the soil to create a smooth seedbed will make effectively conforming and securing the TRM to the surface much quicker and easier.
Vegetation is Vital
TRMs are used on steep slopes, drainage channels, outfall areas, shorelines, and other places where erosive forces make it difficult for natural vegetation to establish growth. Be sure to use vegetation types and seeding rates that have been prescribed by a qualified professional for your particular site. The long term objective of TRMs in such locations is to create reinforced vegetative armoring, with erosion resistance similar to large rock riprap and concrete blocks. However, in order to establish TRM-reinforced vegetation, highly effective immediate erosion protection is absolutely necessary. To maximize a TRMs pre-vegetated performance, it must be installed properly. The InstaTurf ShearForce10 ECTRM is designed for easy, effective installations. And, when installed properly, ShearForce10 provides immediate, day one erosion resistance similar to established TRM-reinforced vegetation, large rock and tied concrete blocks. If you are looking for turf reinforcement mats that are easy to install and offer instant rock-like erosion protection, look no further than InstaTurf.