InstaTurf is a permanent rolled erosion control product (RECP) unlike anything else on the market. To the uninitiated, however, InstaTurf may appear like many other Turf Reinforcement Mats (TRMs) and rolled erosion control products available. We’ve taken the time to outline how InstaTurf works, what makes InstaTurf special, and how to get the most out of the product.
What is InstaTurf?
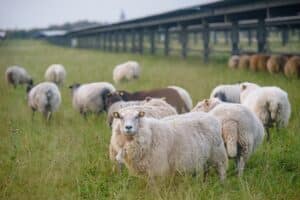
InstaTurf is a lightweight permanent erosion control mat that takes a cue from nature to protect soil in the same manner natural vegetation and grasses do. It combines the light weight and simple installation of traditional TRMs with the superior soil protection of hard armor solutions like rock riprap.
InstaTurf started when erosion control industry expert, Tim Lancaster, sought to mimic the soil protection of real vegetation. After finding an artificial turf doormat in a local hardware store, Tim experimented with the material, and the results were promising. It was important that the mat act like vegetation but also allow natural vegetation to grow through the material. Tim began working with the St. Louis-based producer of the mat, Grassworx LLC. The collaboration produced a design specially engineered to protect soil from erosive forces.
The first product, ShearForce10, was designed to be a multi-purpose, general use permanent erosion control mat with a permissible shear stress rating of 10lbs/sf or more. The collaboration also produced a heavier duty product called ShearForce12 to be used in particularly turbulent, high-flow applications such as pipe and culvert outfalls. As you can imagine, ShearForce12 is made to withstand shear stresses of 12lbs/sf or greater by utilizing a heavy rubber core as a ballast and soil-retaining material. Typically, ShearForce10 will be used over a far greater area than ShearForce12, and ShearForce12 will be reserved for the few highly turbulent areas on the site.
How Does InstaTurf Work?
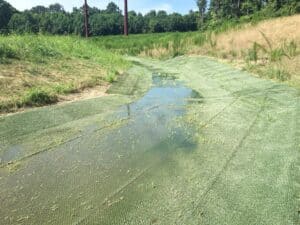
InstaTurf prevents soil loss in a similar way to natural vegetation. The vertical turf structure raises the shear plane above the level of the soil so the simulated grass turf is subjected to the hydraulic forces rather than the soil taking the brunt of the punishment. Underneath the simulated turf structure lies a permeable geotextile fabric that provides filtration so soil is not pulled through the simulated turf. This geotextile is fine enough that soil stays in place, but permeable so natural vegetation can grow through the fabric to encourage local flora development and further protect the soil through the natural mechanisms of root/rhizome development and elevated shear plane.
ShearForce12 works in precisely the same manner, but the soil is further protected by the aforementioned rubber core ballast. In applications where ShearForce12 is necessary, turbulent water flow creates uplift in multiple directions, necessitating further soil protection and weighted anchoring.
How does InstaTurf Compare to Traditional Turf Reinforcement Mats (TRMs)?
InstaTurf is a rolled erosion control product (RECP) similar to conventional TRMs, but with a crucial functional difference: InstaTurf is designed to be as effective as hard armor materials (30-inch rock riprap, in particular) immediately upon installation. Both InstaTurf and traditional TRMs are permanent installations designed to promote real vegetation growth to lend more soil protection and longevity over the course of their respective lifetimes. Traditional TRMs are designed to reach full effectiveness when natural vegetation is integrated with the material, but the crucial grow-in period is treated as a secondary concern. No contractor, developer, engineer, or distributor wants to get the call that the product they recommended, installed, specified, or purchased has failed. Starting over at square one simply isn’t an option for industry professionals. With today’s more frequent high-intensity storm events, there’s no telling what kind of abuse mother nature will throw at your erosion control product.
InstaTurf’s biggest design departure from traditional TRMs is in its use of a 3-dimensional simulated turf matrix. Like real vegetation, this ‘turf’ construction raises the hydraulic shear plane as noted above, but it also serves to differentiate it from the many conventional TRMs on the market. Traditional TRMs are usually composed of fibers woven longitudinally, or planar, to the flow of water. InstaTurf, on the other hand, is composed of vertically oriented simulated turf, more perpendicular to water flow. Where traditional TRMs rely on vegetation establishment to become effective and robust, InstaTurf takes a cue from nature and mimics the soil-protecting attributes of natural vegetation right away while also promoting the growth of real vegetation to further protect the soil.
In short, InstaTurf retains the benefits of TRMs—lightweight, easy to install, compatible with local vegetation, easy long-term maintenance, and affordable relative to other permanent solutions—but InstaTurf manages to circumvent the problems associated with traditional TRMs: a 6-12+ month failure-prone period before vegetation fully establishes, inadequate immediate soil protection in high-flow applications, and poor site aesthetics.
How does InstaTurf Compare to Hard Armor Solutions like Rock Riprap?
Though InstaTurf is an RECP, it can go toe to toe with heavy, expensive erosion control materials like rock riprap and other forms of hard armor. During ASTM D6460 large-scale channel testing of ShearForce10 and ShearForce12 without any vegetation, we found that both products had permissible shear stress ratings equivalent to 30-inch diameter rock riprap and neither failed at the maximum shear stresses applied. Furthermore, as you can see by the ASTM D6460 results below, both ShearForce10 and ShearForce12 performed on par with the much heavier and more expensive tied concrete block mat product. When it comes to immediate, day-one performance, InstaTurf more closely resembles hard armor solutions than TRMs. In the field, though, you’ll notice just how much easier it is to install and maintain.

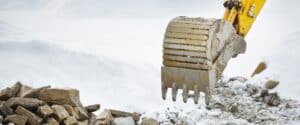
Rock riprap is seen by many as the industry standard for robust, long-lasting erosion control, so one can be forgiven for taking the heavy labor-, equipment-, and material-intensive installation and maintenance processes for granted. Rock riprap usually requires large trucks to carry the heavy material from the quarry to the jobsite. Once rock arrives on site, the headache has just begun. Heavy equipment is required to over-excavate a bed for the rock and place the rocks appropriately. This can be particularly hazardous if, like on many sites, the riprap is installed on a slope.
Once riprap is installed, it is prone to unwanted vegetation growth. Unlike TRMs, vegetation growth poses a problem for riprap installations as it can undermine and displace rocks, leading to reduced soil protection and hazards for passersby, site crews, and nearby equipment or installations. In order to combat unwanted vegetation growth on rock riprap, it is usually necessary to manually spray or pull weeds growing between rocks. The unstable and uneven footing riprap provides makes necessary maintenance a possible danger for crews and equipment.
In total, the cost of transportation and installation of InstaTurf is on average 50% cheaper than similar rock riprap applications. Moreover, InstaTurf ShearForce products can be easily installed on slopes with minimal equipment required for transportation, installation, and maintenance.
How to Install InstaTurf
InstaTurf is an easy-to-install and long-lasting erosion control product, but it’s imperative that it is installed correctly in order for it to reach full effectiveness and longevity.
Step 1: Anchors
Whether you are installing InstaTurf ShearForce products on a slope, channel, downchute, or shoreline, the type of anchors you use to install the matting is crucial to the long-term success of your project. As you can see from the recommended anchors table below, soil type and chosen ShearForce product play an important role in determining what kind of anchor you install. If an inadequate anchor is used during installation, you are inviting mat failure, water ingress, and subsequent soil loss.


Step 2: Prepare Seedbed
A smooth seedbed is essential to ensure InstaTurf ShearForce products achieve and maintain intimate contact with the soil surface to effectively lock down the soil and allow unimpeded vegetation growth through their simulated turf structures. Rougher soil conditions will require more anchors to achieve adequate mat-to-soil contact. Be sure to eliminate any existing rills, soil clods, sticks, or rocks larger than 2-inches in diameter. Your diligence during this step will pay dividends for years to come. It is also imperative that soil used to prepare the seed bed be adequately compacted before seedbed preparation and installation.
Step 3: Seed and Fertilizer
This is where InstaTurf ShearForce products really strut their stuff. Because InstaTurf products are designed to be immediately effective as rock riprap and only increase in effectiveness as vegetation grows through, now is the perfect time to get a head start on vegetation growth. Seeds can be distributed by broadcasting, drilling, hydro-seeding, or other methods. If installed correctly, there is little risk of mat failure as vegetation grows in.
Step 4: Position and anchor leading edge of mats
Whether you are installing ShearForce10 or ShearForce12, positioning of the leading edge of the mat is important. In the case of slopes, the leading edge should be placed at the top of, or over the shoulder of the slope. In the case of channels, downchutes, and spillways, the leading edge should be properly anchored at the in-flow end of channel to prevent water undermining the mat and causing erosion problems from the start.
ShearForce10
Because ShearForce10 is a flexible and lightweight product, there are a couple of options for anchoring the leading edge. Ideally, you will dig a 6-inch wide by 6-inch-deep anchor trench across the top width of the slope or along the in-flow edge of the channel. In this trench, anchor the leading edge of the mat simulated turf-side down with the remainder of the mat facing away from the direction of the slope. It is important that mat rolls are aligned with the direction of the slope unless you intend to install them horizontally. Adjacent rolls should overlap on top of the 2-inch Seam-Loc edges to prevent water ingress and mat failure. Finally, backfill the trench and unroll the mat down the length of the slope, passing over the backfilled trench.
If it is undesirable or unfeasible to dig an anchor trench, a double row anchor check may be used to secure the leading edge of the mats. Position the leading edge (or nubbed Seam-Loc edge if installing horizontally) with the simulated turf facing up. Secure leading edges of mats with a row of anchors spaced 6-inches apart, then install another row of anchors 6 inches behind the first row, staggered to the first row so the connection is as secure as possible.
ShearForce12
Because ShearForce12 is a less flexible mat, it is not suited for 6-inch anchor trench installation. Rather, we recommend installing your chosen anchors at 12” intervals along the leading edge, be it at the top of a slope or the in-flow end of a channel.
Step 5: Seam Adjacent Mats
How you seam adjacent mats is crucial to the long-term effectiveness of your ShearForce installation. One of the quickest ways to compromise your erosion control solution is to allow the edges of mats to come up, causing soil loss and water ingress under the mat, compromising the entire installation.
ShearForce10
ShearForce10 mats each come with a Seam-Loc edge where the simulated turf is shortened to allow a virtually “seamless” overlap between adjacent mats. Unroll the mat from the direction of your previously-anchored leading edge. While unrolling, slightly stretch and relax the mat to eliminate any wrinkles. Wrinkles will reduce mat-to-soil contact and introduce weak spots in protection and vegetation growth through the mat. The name of the game is good, continuous contact with your seedbed surface. Proper contact with the seedbed will ensure long lasting erosion protection and minimal maintenance. To this end, it is recommended to let unrolled mats acclimate in the sunlight for 15+ minutes to avoid excess shrinkage or expansion that may result in wrinkles in the mat following installation.
Overlap the full turf edge of one mat with the flat edge of the adjacent roll. If you are installing ShearForce10 horizontally to the direction of water flow, it is recommended that you place the full turf edge upslope from the flat edge of adjacent rolls so water passes over the seam rather into it, which has the potential of lifting the mat edge. Think of the way a shingle works—that’s how you overlay the Seam-Loc edges.
Once in place, anchor along the Seam-Loc edge at the prescribed intervals.
ShearForce12
ShearForce12 does not have the Seam-Loc feature due to the thick rubber ballast at its base, but seaming adjacent mats is still a simple job. Simply butt mat edges together and anchor on 18-inch centers across the 3-foot mat width, and 24-inch centers along its4 -foot length . It is very important that you don’t overlap edges on ShearForce12 as this invites water ingress and mat failure due to the absence of the Seam-Loc edges.
Step 6: Anchor Mat to Soil
ShearForce10
Starting at the top of the slope, or alternatively at the in-flow leading edge (whichever fits your use case), fasten anchors into the mat at 18- to 24-inch intervals down the length of the mat. Again, the name of the game is contact with the ground, so if your soils are non-cohesive, or significant flow is expected, err on the side of caution and install anchors at 18-inch intervals along the length and width of the mat. Use additional anchors at any position where the mat wrinkles or bridges over the soil to eliminate excess voids below the mat and ensure good contact with the soil surface.
If installing in a channel, downchute, or spillway, be sure to anchor mat edges at the top of side slopes using either the 6-inch trench method outlined above or, in cases where this is not possible or feasible, install a single row of anchors spaced 6-inches apart.
ShearForce12
Along the 4-foot edge of the mat, install anchors at 24-inch intervals. Along the 3-foot edge of the mat, install anchors at 18-inch intervals, making sure to install at least one anchor in the center of the mat. Use additional anchors as necessary to ensure the fabric on the bottom of mat makes complete contact with the underlying soil surface.
In general, maintaining good contact with the ground and preventing water ingress or lifting at the edges of the product are the keys to success when installing ShearForce products. For additional tips and explanatory diagrams, visit our resources page for installation guides for each product in different applications.
If you have any further questions about InstaTurf, contact Tim Lancaster. He’ll be happy to set up a Lunch and Learn presentation or simply have a dialogue about any aspect of InstaTurf or your particular erosion control needs.